Labels


Sunday 1 March 2020

11+ Backyard Stations


Last year I had an epiphany that has really changed my life:  Backyard stations are the solution to all my problems.

Well, maybe not all my problems, that's a big ask, but they do encourage prolonged outdoor play and who doesn't want more of that?!

Following are the stations I've been setting up for my kids.  

Now that I have collected all the items for the stations, it only takes a few minutes to set them up, and they result in hours of extended play.  They also promote an active lifestyle and healthy child development (Australian Curriculum, Health and PE).

We went 'screen free' these past holidays so it was good to have some outdoor ideas in my arsenal.  The transition to 'screen free' turned out to be really easy for us.


1.  Digging / mud pit


This station has shovels, buckets, a pick axe and trowels.  We're big fans of these Ames shovels.

Once in a while I leave the hose on for a bit to create a mud pit.  


It's great fun to bounce straight off the trampoline into knee-deep mud... and my kids love digging for 'treasure'.


Muffin pans and natural items make nice additions to this station.

2.  Water play


As well as putting out measuring equipment and water toys, I snip some flowers and herbs for this station.

Chalk, a hammer, mortars and pestles offer extra play possibilities.  The chalk can be crushed and mixed with water to create paint or used straight on the pavers.  

Sometimes my sons ask for cloth to dye with flowers or spices to grind up.
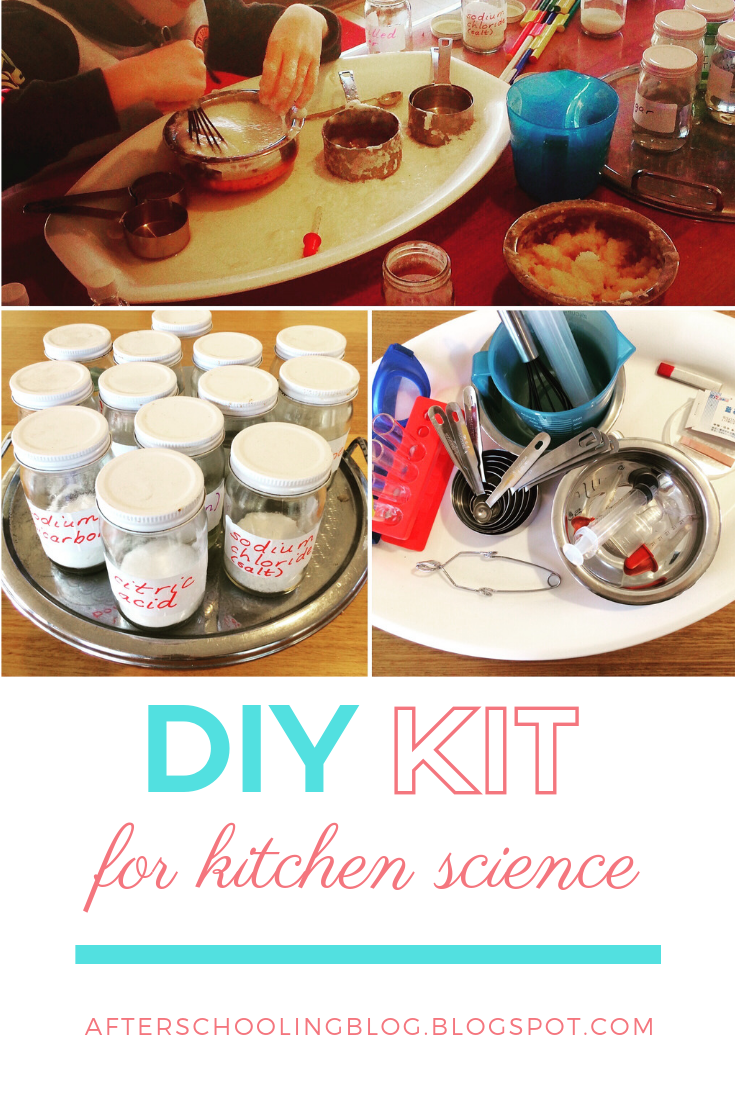
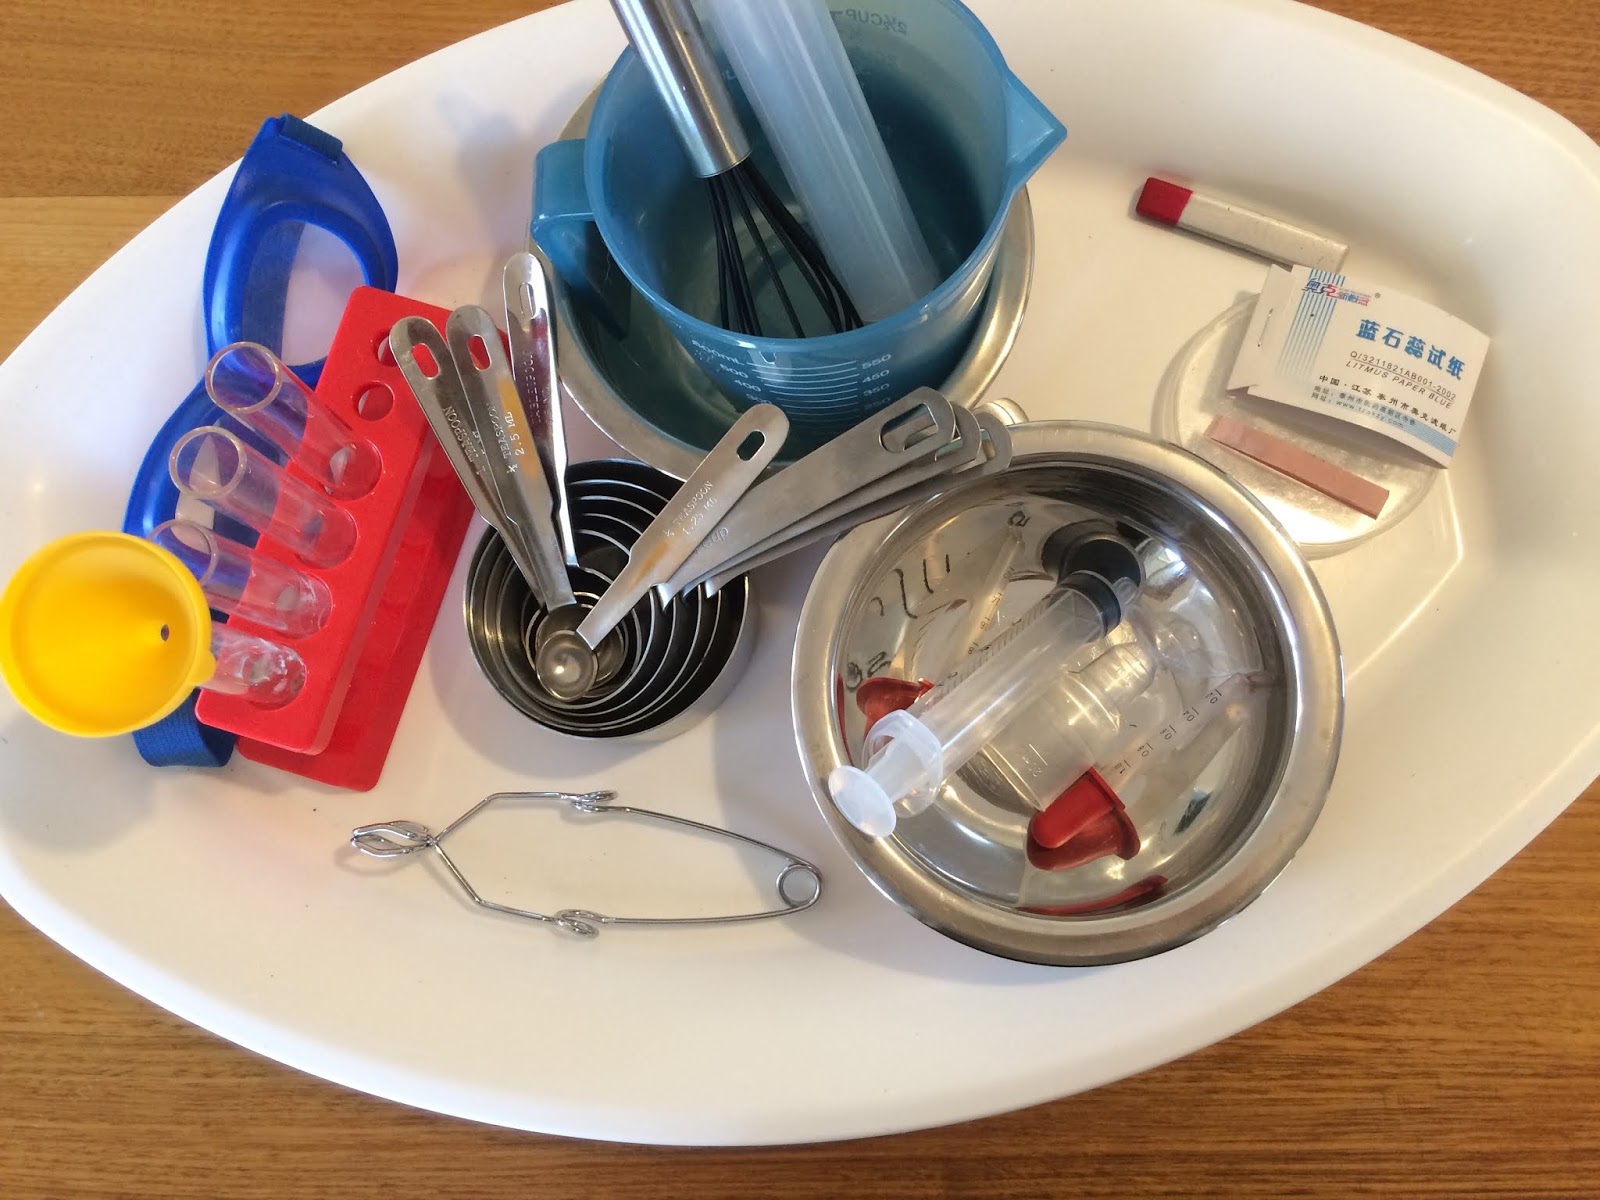
3.  Trestle table


On a table I put some easy art or science activities, such as our DIY science kit, watercolour paints, a nature tray with magnifying glass, playdough, or seeds for bird pizzas.

4.  Small world play


My kids are really too old for this, but they can still be enticed... the trick is to call it 'diorama creation'. *Smug smirk*  

Both my boys have enjoyed making biomes and habitats for plastic animals at different times.  You could add dinosaurs, diggers, fairies... 

5.  Gardening


My sons are sometimes in the mood to earn extra pocket money by pulling weeds.  They also LOVE cutting up large pieces of garden waste with loppers and the saw.


6.  Rugs and cushions

If I leave out a picnic rug, my oldest will invariably bring out his current book to just chill.  As well as rugs and cushions, I have a double sleeping bag dedicated to outdoor use.


I'm into meditation at the moment and quite enjoy using these cushions and rugs to meditate outdoors.

7.  A strategy game

We keep a congklak board outdoors.  (My son is making these to sell so if you want one message me through the address in my profile.  Post coming soon about congklak).


8.  Whittling


This is something we're only just getting into:  For Christmas my son Roo got some whittling books - Forest Craft by Richard Irvine, The Little Book of Whittling - and an Opinel No.7 knife.  You can also get an Opinel with a round tip, but we went with the sharp tip. 

9.  Fire


We have an antique Italian brazier called a frascera which we use when the weather is cold.  The kids love to toast things on it or occasionally cook in it.  We also sometimes share poetry and stories around it.

When it's hot I have been known to put out block play instead.  We have some tree blocks (similar here) but be warned, they make much more mess than regular blocks!

10.  Painting


I usually only set up our easel when we have younger cousins or friends to visit.  I put a low table next to it with paints, sponges, trays, brushes, sticks and rubber bands for making nature brushes.

11.  Nature study


Just inside the door I sometimes put a bowl with basic nature study tools such as a microscope, motion camera, guide books and a bug box.

We have a terrarium inside for little critters like snails that the kids find in the yard.

Shelley is a guts

Plus... our yard also has some permanent features:
  • a cubby with a rope ladder
  • a tree to climb
  • a trampoline
  • bikes
  • a box of sports equipment
  • a box of loose parts (like tarps, sheets, ropes, pulleys, tubes...)
  • a hanging xylophone
  • an insect hotel
  • logs and stumps
  • our 'corner office'.

And of course we have fruits, veggies and herbs that my youngest son loves to tend and eat.

The best thing about these 11 backyard stations is our increased connection with the natural world and with the elements of earth, fire, water and fresh air!

I'd love to know what you do outdoors.  Please tell us in the comments.

Thanks for stopping by.  Looking for more outdoor ideas?  Try these:
New to the Afterschooling Blog?  Try my A-Z of Afterschooling!
x x Zoe


Tuesday 4 February 2020

NEW Game: Waters Edge


This is the first post in a series of game reviews, for those people who love 'gameschooling'.

If you're looking for a gift for someone special, one of these games may be the perfect thing.

In each post I'll review a game, give you the pro's and con's, and tell you who will benefit most from the game.

Waters Edge

We were lucky enough to get our hands on an advance copy of Waters Edge, a new game that's just launched.  You can pre-order a copy here.

We're not affiliated with Waters Edge, this is our honest opinion after playing the game.

This crowd-funded game is made by Scottish artist Catherine Redgate.  It's based on a cottage fishing industry, although you don't need to be fishing-mad to enjoy it.

After playing this game we had some great discussions about systems (inputs, processes, outputs) and sustainability (Australian Curriculum).

Pros

This game is complicated enough to engage adults and older children.

The artwork is simply stunning.

Although there is luck involved, it also requires some skill, which is a pro in my book.

Because there are a lot of cards, the game is quite different to play each time, depending on which cards come up most.

The playing time for us has been in the 25-40 minute range, which is perfect for a quick after-dinner round.  The playing time is determined by the 'time of day' and 'day of the week' cards.

The way the game operates - building up the lighthouse and shops, shifting fish between your boats, ice house and village - is really unique and fun.

It has a quaint, old-fashioned feel:  A throw-back to seaside communities of yore.

The cards and instructions are high quality and easy to follow.

It's made in Scotland but suits a global audience.

Cons

It's too complicated for early learners.

This game would lend itself really well to team play and it's a shame that's not how it's intended to be played.

Who this game is for

This game is perfect for fans of card games that involve an element of luck but also some decision-making.

As yet, we haven't had ANY sibling squabbles over this game.  ZERO!

We tend to have a problem in our house with games of pure strategy... After a certain point there is a bathetic descent, because certain people can't blame bad/good luck for losing/winning!

So if pure strategy games are a combat sport in your house, Waters Edge is for you.

There's a certain amount of decision-making about when to move fish and which cards to play, so you do get to exercise your grey matter, but there's enough luck involved to keep things light-hearted.

Waters Edge celebrates something that transcends ages and cultures:  The act of procuring food from the sea.


What are your recommendations for games?  We'd love to know in the comments.  

Thanks for your time.  Stay tuned for our next game review: The Ancient Egyptian Game of Senet.  In the meantime, try this post with our favourite maths games:  10 Maths Games You Don't Want To Miss.

x x Zoe


Friday 31 January 2020

"This Is WAY Better Than Flashcards!"


Following are a few hands-on ideas for exploring the Ancient World, and a revision activity which is, in my son's words, WAY more fun than flashcards.

We used it for language learning, but you could use it for any rote facts, like times tables or spelling words, and your children will be begging to learn!

The hands-on activities at the end of the post will have your kids hooked on Ancient History.

My youngest son Roo has been re-reading the Percy Jackson series by Rick Riordan and that sparked an interest in learning Greek.

Did you know the Ancient Greeks and Romans used slingshots as weapons, and they sometimes wrote sarcastic insults on their lead shot?  "For Pompey's backside!"

I surprised Roo with the gift of this slingshot and some small rocks the perfect size to use in it.

He was so excited when I gave it to him, and he loved the idea of writing Greek revision phrases on the rocks.

We wrote some general revision, but of course we also had to write some insults (Roo convinced me it's a great way to practice animal words).  We've been using My First Book of Greek Words.  


He insisted on trying it out straight away, even though it was super dark out!

Don't you love that this idea takes a weapon and turns it into a tool for learning??

You could write anything on the rocks; times tables, spelling, formulae...  Practise each one before you shoot and again when you collect your shot.


The slingshot gift was a hook to get him interested in exploring the Ancient World.

I often use this simple afterschooling formula: A hook, a field trip and a hands-on activity.  (Here are some other examples of that formula in action.)

For our field trip we went to the John Elliott Classics Museum and got to see real Roman slingshots, as well as lots of other fascinating artefacts.

Hands-on activities:

We wrote spelling words on real papyrus using a traditional bamboo reed pen, and compared it with using a quill.


We used some homemade Roman numeral coins to do some maths.  (Email me through the address in my profile if you want some made for you.)


We also re-watched The Story of 1 about the ancient history of mathematics...


... and we played petteia, an ancient game of pure strategy.  I made a petteia board (download here on TPT) with useful Modern Greek words for revision.  You could also draw your own board.  Check out more info about the history of the game and how to play here.  In my version, players read the word or phrase aloud and translate it into English as they move onto it.  This game really taxes the grey matter!


Next we wove laurel leaf crowns like Apollo's... Toga party anyone?  I bought some florist wire (similar here) and the boys used sprigs of our own bay laurel.


And finally we cooked Greek pita bread on our campfire.  I think this is the same grill we have and love.  The recipe we use isn't super authentic because it's a yeast-free version: Roughly 4 cups of flour, 1 teaspoon of salt, 100g butter and 375mL milk with some olive oil.


I also got the boys to read an article from Historicool magazine and do some written work from the teacher resources.

Now we're reading Horrible Histories The Groovy Greeks and The Rotten Romans.  I adore that series.

My aim with these activities was to promote interest so my kids would be more engaged when they got to this topic in Year 7 (Australian Curriculum, The Mediterranean World).

Next I want to touch on Ancient China... We've started by watching this hilarious rap battle between Ancient China and Ancient Greece from the Horrible Histories TV show:


Here's Roo hitting the books with renewed vigour to learn Greek:


Over to you.  Do you know any fun activities that make revision a bit more exciting?  What about resources for learning about the Ancient World?  Please share with us in the comments below!  Thank you :-)

If you liked these ideas, please share my blog on Facebook or Twitter using the buttons below.  Post coming soon: The Grossest Revision Game Ever!  New to the Afterschooling Blog?  Try our A-Z of Afterschooling.

Here are some more hands-on ideas for activities:
THIS POST IS DEDICATED TO REBECCA, WHO ENCOURAGED ME TO GET BACK INTO BLOGGING!  Thanks, Beck.

x x Zoe


Thursday 4 July 2019

Forest School Maths


Any maths you can do inside, you can do outside too!

Wild Math Curriculum is a brilliant resource for Foundation to Grade 4.  It covers very similar content to the Australian Curriculum.

I recently put together an outdoor maths kit with my favourite resources so that we can include more maths when we go on nature walks.

In our outdoor maths kit I included tools for measuring and recording.  Complete list at the end of this post!

My younger son Roo painted cards with fractions, decimals, percentages, large numbers and negative numbers (plus a few blank ones!).


They're great to use on an outdoor number line, or for working out equations in the dirt.


We drew a graph in sand and started putting our nature finds directly into the columns.  Now my older son S-Man is trying to work out a statistically valid method for estimating absolutely everything on the beach.


When I'm out walking with Roo we try to find the best trees to hug.

That invites mathematical questions:  What's the circumference of the tree?  Can we work out the diameter of the tree from the circumference?  How can we measure the height of the tree using its shadow?


Roo in particular seems to need time in nature to de-stress.

S-Man wanted to know if there's a relationship between rock pool size and distance from the ocean.  Here they are measuring rock pools, while lunch is cooking in the billy:


Those are the kinds of days I imagined and looked forward to when I was pregnant with my first child.  *Content*

Here are my must-have tools for Forest School maths:
  • a flexible measuring tape
  • dice
  • a ruler
  • chalk
  • rubber bands
  • numbered rocks (with some operation signs, too) 
  • a permanent marker for writing on rocks and leaves 
  • a large protractor 
  • about fifty gumnuts (or shells... small natural items)
  • a couple of small buckets 
  • string 
  • paper bags
  • clipboard and mini note-pad
  • graph paper
  • cards - blank and numbered
Fraction sticks are another great idea which we haven't tried yet.  

We also have our nature journals and other nature study tools which we keep in our nature study backpacks.

Have you tried any outdoor maths ideas?  What would you put in a Forest School kit?  Please share in the comments.

For another outdoor idea, try making one of our birdfeeders.  THANK YOU for visiting our blog!


Saturday 8 June 2019

Busting A Language Learning Myth


Kids learn languages much, much more slowly than adults do.

People are always surprised when I tell them that, because there's a myth out there that children soak languages up like a thirsty sponge.  I’m a teacher of languages and this is kind of my bugbear!

Well, here comes a fed-up, pinheaded gladiator to destroy that myth once and for all:


The myth is a convenient excuse for us adults not to put ourselves through the pain of learning a foreign language.

Because it is painful: You make yourself incredibly vulnerable when you're first trying to speak a second language.

It can be tremendously disorientating and frustrating, but also immensely rewarding, because you learn so much about the world and other people.

It's frustrating and disorientating for children, too, perhaps even more so than for adults!

To spontaneously speak another language, kids need to hear it at least 30 percent of their waking time.

Getting twenty hours of tuition a year through a school program just isn't going to cut it.  Think about it:  Children have in excess of 10,000 hours of their native language under their belt when they first come to school, and they still can't speak their native language well!

Adults are so much faster at learning languages because we have metacognitive and study skills, not to mention much greater language capacity.

We can understand abstract grammatical concepts and apply them.

We know how to teach ourselves stuff.

And we're not learning a whole bunch of other things at the same time, like how to use a toilet!

The sad consequence of this myth is that children born into families where one parent speaks a different language often FAIL to become fluent in that parent's language - which disappoints and saddens the family immeasurably because they had the unrealistic expectation that their child would learn the language like a sponge.

Children THEMSELVES feel disappointed after they've studied a language for years in school and they STILL can't speak it properly.

Some people would use that as a reason to cut language programmes from schools altogether.

That is the worst possible thing we could do!

Why?

Because the positive side is that those same children - who have a Tagalog-speaking father, or who learnt French at school with a crazy-fun teacher - often become adults who are motivated to learn another language, and who do eventually go on to be proficient second language speakers.

What we should be communicating to children is that it's normal for children not to become fluent in a second language quickly, but also normal for those children to turn into adults who do become fluent.

Learning a language takes time and persistence.  The only way you can possibly fail is if you give up.

Unfortunately, that's what lots of people do, believing they're just naturally bad at languages.

Slow language learning is not a reason to turn school language programmes into culture-only programmes, either.

Why?

Because learning someone's language is the single best thing you can do to understand their culture.

I'm not sure where this myth of the child-sponge started, but maybe it has something to do with the fact that learning languages early in life does make you less likely to have a strong accent, since you're still laying down auditory pathways in the early years.

Personally, I love my accent and wouldn't give it up for the world!

Have I convinced you?  What are your thoughts?  Are you ready to meet the rest of the world half way and learn their languages?

If so, go and enrol in a language class right now, or sign up for Memrise!

Still not convinced adults are faster language learners than children?

Then here's a REAL gladiator to kick that pernicious myth's butt!  (Trust me, he could.)


Let me know your thoughts in the comments.

Interested in learning more about the world?  Explore our Calendar Clinkers game!  Thank you so much for reading, you're the best.

Sunday 2 June 2019

DIY Kitchen Science Kit For Kids


Most of the items for this awesome DIY Kitchen Science Kit are probably already in your house!

Your children will enjoy many happy hours of scientific play with this kit.

We've had our kit for a few years and it's still popular with my 9-year-old.  It's suitable for preschool and up.

Some of these items are only to be used under supervision.  If I have younger children over to play I only put out the edible items.

Here are some concepts that kids can explore with this kit:
  • Chemical changes (making slimes... explosions...)
  • Acidity and alkalinity
  • Starch content
  • Density of different liquids

The whole point of this kit is to allow kids to be as independent as possible, and to encourage them to see themselves as scientists.

The only intervention I ever give is to guide them in asking good questions.  Sometimes I also give them some perishable items, like milk, apple and potato slices, or celery sticks.

If you want to leave this kit in a prominent place for your kids to discover, or even set up a permanent science zone in your house, I've got a free printable for that!  (No butterflies were harmed in the making of this sign.)


The DIY Kitchen Science Kit has two parts; the substances and the equipment.

1.  The substances


I bought a bunch of uniform jars and labelled them.  That's mainly so I can control how much of anything gets used, plus it just looks awesome!

I think I got my jars from the thrift store, but I've seen them in Kmart in the scrapbooking section (here).

I made sure to write DO NOT EAT on inedible items:  This site explains how to label and store chemicals safely.  Kids should never be left alone with those items, even if they're old enough to know not to eat experiments.  Err on the safe side!

Ingredients to fill the jars:
  • Sodium bicarbonate
  • Citric acid
  • Corn oil
  • Sodium chloride (salt)
  • Sugar
  • Vinegar
  • Gelatin
  • Cornflour
  • Distilled water
  • Food colouring mini bottles
  • Glucose syrup
  • Dish liquid - DO NOT EAT - both Fairy and Earth are good because each works better in certain situations (for example the reaction from detergent and salt works much better with Earth) 
  • Alka-Selzer tablets DO NOT EAT
  • Iodine DO NOT EAT
I also had some surplus bottles of banana, peppermint, rosewater and pandan essences so I added those for some super-aromatic fun!

2.  Equipment

We started out with just a few kitchen implements, but have gradually expanded.  You don't really need much.

  • Clipboard and pencil for recording experiments
  • A couple of mixing bowls
  • Whisk
  • Measuring cups and spoons
  • Old medicine droppers and syringes
  • Blue and red litmus papers
  • Measuring jug
  • Goggles and lab coat - these instil good habits around lab safety and help fire up the imagination!
  • Nitrile gloves (iodine and food colouring stain hands)
  • Tray
  • Plastic table cover, and one for the floor if you need it - this is optional but it certainly makes clean-up easier... Science in our house can get MESSY!  We got ours from PJ's.
I ended up adding some test tubes, but you really don't need them.

Here's Roo investigating:


So that's a round-up of the substances and equipment in this awesome DIY Kitchen Science Kit.

I hope you get as many hours of fun out of it as we have!

Is there anything else you'd add?  I'd love to know in the comments!

Thanks for reading.  Interested in kitchen chemistry?  Try our Harry Potter Invitation or Sweet and Fat:  4 Easy Inquiries.


Friday 24 May 2019

15+ Awesome Early Childhood DIYs


It's time for some activities for the little ones!  My sons are both upper primary now, but I love planning activities for our younger nieces, nephews and family friends.

My brother-in-law asked where I get my ideas for early childhood activities.  The answer is:  Pinterest! You can check out my pinboard for younger kids here.  

Now, what you've come for:  Easy DIYs that will keep your little ones busy and learning!

1.  Pringles can posting toy


This one has been SO incredibly popular with the 18-month crowd.  It helps develop fine motor and colour recognition skills.  It's also really, really easy to make with some dot stickers, pipe cleaners and a hole punch.  I used the half-size Pringles can.

2.  Straws and toilet rolls with holes


Good for fine motor, but I also add some items to encourage pretend play, such as toy animals or toilet roll characters like the Old Tom below.  Older children can make their own toilet roll characters.


3.  Large popsticks with Velcro dots


This works best if you display a few straight-sided shapes or a shapes board book.  

4.  Egg carton bean sorting


Even my primary aged children still enjoy sorting beans.  

5.  Ball posting


Sometimes the simplest educational activities are the best.  This helps toddlers develop understanding of object permanence, but it also hones motor skills.

6.  Felt faces


This activity is great for using up scraps of felt.  You could also add yarn hair.  Good for developing oral language.

7.  Button threading toy


Again, great if you have scraps of felt to use up.  Develops fine motor skills.


This is a good one to make WITH your child.  Just be careful your younger ones don't pull off the bells and choke.  As well as developing rhythm skills, this can be used for syllables and poetry.

9.  Box tugging toy


Another one for younger children developing understanding of cause and effect.

10.  Felt shape matching toy


Can you tell I love using up leftover felt?

11.  Sponge blocks


For when you get sick of the noise of block towers falling down.

12.  Alphabet spoons


The white spoons have lower case letters and the clear ones have upper case, for alphabet recognition in preschool/junior primary.  If I made them again I would make sure the upper case letters didn't cover up the lower case ones.

13.  Bottle cap spooning


Spooning floating bottle caps out of water helps toddlers develop their motor skills.  You can add a sorting element to it by having different containers for each type of bottle top.

14.  Dyed pasta threading


Dyed pasta is super easy to make.  Younger children can thread it onto pipe cleaners, while older children can use a needle.  Fine motor, patterns... this is a good basis for later maths skills.

15.  Pop-top peekaboo shakers


These are great for music learning, but also develop object permanence.  I used some small erasers and insect toys inside the rice.

16.  Paper shape pictures


I feel embarrassed posting this one it is so easy, but kids love it.  Shapes, paper, glue and googly eyes make for the craziest robots, monsters, landscapes... 

17.  Mug tree colour matching toy


I found a mug tree at a garage sale, so I used some surplus curtain rings and paint to create a colour matching toy.

18.  Hand sewn soft toys with loops, tags and fasteners


If you're handy with a sewing machine (which you can tell from the above photo I'm not), you can make your own educational toys.  My most popular one was a simple bag with a zipper which my niece enjoyed opening and closing, putting things in and taking things out.

19.  Activities with natural items

I'm going to do a more detailed post on this topic, but some of my most loved activities have been rocks with numbers, rocks with lines, playdough with natural elements, and sticks with masking tape. 

Over to you!  What easy DIYs have been popular with your kids?  I'd LOVE to try out your ideas, so please tell me in the comments below.

New to the Afterschooling Blog?  Try our A-Z of Afterschooling.  If you liked these ideas, please share them using the buttons below!